When it comes to measuring the effectiveness of IT support, many senior business leaders find themselves drowning in a sea of data, with no clear understanding of which metrics really matter. In this blog post, we’ll be taking a closer look at three key metrics that every business leader should be paying attention to when it comes to measuring IT support performance and optimising the effectiveness of IT within their organisation.
Customer Satisfaction
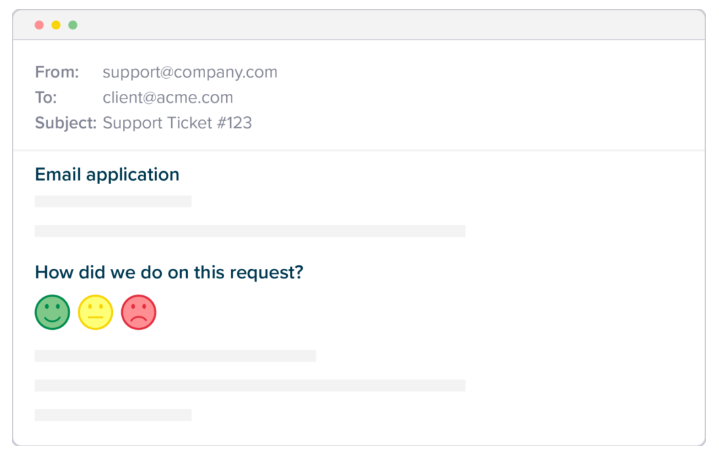
Customer satisfaction (CSAT) is a direct measure of how satisfied your end users are with their experience of your IT support services. CSAT feedback is usually captured through a simple online survey directly from the end user on completion of each interaction, with results presented as a percentage score. If you’ve ever clicked on a red or green smiley face icon in a support email, then you’re familiar with a CSAT survey.
The end user experience (and therefore CSAT) can be impacted by many factors, such as how easy it was to engage with IT support, how quickly and effectively the issue was resolved, and how friendly and supportive the IT support person was in their communication. Many of these metrics can be tracked individually, but arguably are most useful when considered in combination through the resulting metric of CSAT.
Why is CSAT important?
Customer satisfaction is a metric that speaks to the quality of the IT support service being delivered. Whether you have an in-house IT support team, work with an external IT support partner, or some combination of the two, ensuring that the service being delivered is of the highest quality should be a core KPI of business leadership.
Issue Categories
All IT support issues should be logged as tickets, and all tickets should be categorised in a number of different ways. A common approach to categorising support tickets is to use the industry standard ITIL guidelines, meaning a ticket may be categorised using one or more of the following:
- Priority – Often a numerical scale from 1 to 4, where 1 is urgent.
- Type – Often using categories such as “Incident”, “Request” and “Problem”.
- Sub-type – Next layer categories such as “Hardware”, “Software” and “Accounts”.
Irrespective of what labels and values are used to categorise IT support issues, all issues must be categorised consistently to not only guide response efforts, but to allow for later reporting and analysis.
Why are Issue Categories important?
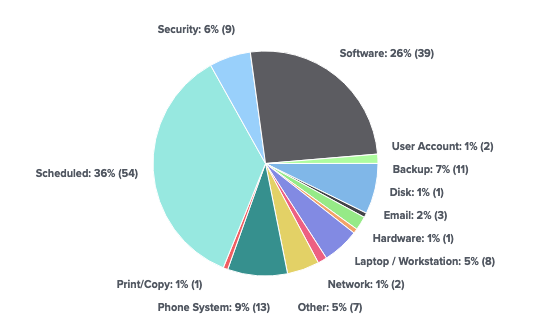
Issue categories provide an extremely important feedback loop to management on what is working well within the organisation and what needs attention. For example, an analysis of all urgent “Priority 1” issues may identify a particular piece of networking equipment that is repeatedly failing and causing significant disruption to business operations. By identifying this, management can choose to replace the faulty equipment, thus saving the business from further expensive downtime.
Another example may involve the discovery that there is a particularly high number of “Incident” style issues related to a particular software application. Further investigation may identify a misconfiguration within the software, or perhaps a lack of knowledge amongst staff of how to use the software, leading to errors. In either case an opportunity has been identified to remove a problem and improve productivity.
Stale Issues
Stale issues are issues that are not resolved within a reasonable timeframe. What constitutes a “reasonable” timeframe will differ from one organisation to the next, however a good starting point may be to use the average resolution time across all similar issues. The specific timeframe used is less important than the intent of the exercise, which is to draw attention to issues that, for whatever reason, are not progressing to resolution as would normally be expected.
Common causes of stale issues can include:
- Insufficient IT support capacity or knowledge to resolve issues in a timely manner.
- An end-user not engaging with IT support attempts to resolve their issue.
- An external vendor not responding to IT support escalations in a timely manner.
- A resolution requiring significant change or investment from the business.
Why are Stale Issues important?
Stale issues indicate a bottleneck, or even a complete blockage in the normal IT support process. The bottleneck may be temporary, or it may be more systemic, but in either case the usual processes are not functioning as normal, and an opportunity may exist for management to step in to either help clear a temporary blockage, or to explore opportunities to remove systemic issues.
Conclusion
Monitoring key IT support metrics is vital to maintaining service quality and driving the effectiveness of IT within the organisation. The challenge can be separating the signal from the noise, identifying those metrics that actually matter, and not becoming distracted or overwhelmed by everything else. By focussing on these three IT support metrics, you will have a clear line of sight on service quality and opportunities for business improvement.
The last few years have brought technology to the top of the business agenda in a way that only a global pandemic could. Despite this unprecedented focus on information technology, and the frantic pace of change to keep up, there has been relatively little attention on true innovation. From our perspective, working with medium-sized Australian businesses, it appears that most spending has instead been concerned with paying back technological debt accumulated over years of under-investment.
The dual demands of a suddenly remote workforce and a rapidly escalating cyber-security war have knocked the wind out of many organisations, forcing them to urgently defend ground rather than seek competitive advantage. The hard learnt lesson for many is that outdated technology and business processes can rapidly flip from hard-worked assets to existential threats.
With the challenges of the pandemic slowly receding, it’s time to shift our attention to the future. To not only take stock and ensure that we have the foundations in place for success and growth but to consider some of the exciting opportunities that lie ahead.
Read on for three technology trends to watch in 2023.
Artificial Intelligence goes mainstream
For what feels like forever, we’ve been hearing the competing voices of AI proponents and detractors both promising very different, but equally startling, futures. On one hand, blissful hyper-productivity; on the other, apocalyptic job losses and societal decay. Neither prediction has come to pass. Indeed, if the utility of Apple’s Siri is anything to go by, we’re safe from any real disruption from artificial intelligence for the foreseeable future.
The fact is that we all benefit from AI every day. Every time you unlock your iPhone with face ID, scroll through a social media feed or trust your bank’s fraud detection systems, artificial intelligence is doing the heavy lifting behind the scenes.
So why will 2023 be the year of artificial intelligence? Quite simply because we have reached a tipping point. Indeed, that tipping point was reached on 30 November 2022 when OpenAI released ChatGPT and captured the popular imagination with their impressive AI chatbot. Not only are non-technical users finding ever more creative, useful and disruptive ways of using ChatGPT, but even Google has taken notice, reportedly concerned about the threat AI poses to its core search engine business.
This year we expect to see continuing strong uptake of existing applications and services built on AI (see below for more). More interestingly though we expect to see mid-sized organisations begin to experiment with integrating AI into existing applications and business processes using services such as Power Automate, ChatGPT and Azure AI.
Further reading:
- ChatGPT – Try it for yourself.
- Creating an effective AI strategy – A collection of resources to support business leaders through their AI journey.
- How to design an AI marketing strategy – Primarily concerned with the application of AI in marketing, but the authors present a framework that is equally applicable to any other department.
Existing AI-based applications to explore:
- Automatically import bills, receipts & invoices into your accounting system with Hubdoc or Dext.
- Audit your accounts for bookkeeping issues in real time with XBert.
- Create sales & marketing copy with Jasper.
- Write clear, powerful communication with Grammarly.
- Integrate AI into your existing applications & business processes with Azure AI.
Business Process Automation gains traction
Curiously enough small and micro-businesses have historically embraced opportunities to automate business processes more readily than their mid-sized counterparts. Larger organisations often seem content to maintain the status quo and simply spend more human labour on a task rather than applying technology and automation. To be fair though, smaller organisations don’t usually have to deal with legacy systems or the greater cost of change that can come with larger scale, and the price of failure can be higher.
2023 however is shaping up to be different for two reasons. First, the cost of labour continues to rapidly increase. Blame it on inflation, the great resignation, or any number of other reasons; the fact remains that employment costs, from recruitment through to retention, show no sign of easing any time soon.
The second factor is that the pandemic provided organisations with an unprecedented ‘burning platform’ opportunity, allowing them to shake off legacy technology and work practices in favour of modern cloud platforms, in the process putting automation far more within reach.
Here are some things that we expect to see accelerate over the next 12 months.
- Organisations doubling down on their commitment to a single platform such as Microsoft 365, to take advantage of built-in process automation opportunities.
- Increased adoption of no-code tools such as PowerApps to build custom internal apps rapidly.
- Integration of Robotic Process Automation and Artificial Intelligence to automate existing legacy systems.
Cybersecurity
OK stay with me on this one. We’ve been talking about cybersecurity for years now, and for good reason. If there’s one thing that has the potential to destroy an otherwise great company, it’s a security breach. So, what’s changed to put cybersecurity on the map (again) for 2023?
Put simply, various factors are coming together to drive home the point that security is no longer just an IT problem. In fact, those organisations that continue to treat it as an IT problem are going to find themselves hitting more and more obstacles to doing business.
For starters, many contracts are starting to require a compulsory level of security compliance, and even cyber-insurance, from all parties. Not compliant with at least Essential Eight level one? Your sales team’s going to be cranky when they get disqualified from that big deal because of it.
Speaking of cyber-insurance, not only are premiums rapidly increasing but simply complying with policy requirements is becoming far more difficult. We’ve spoken with several organisations in recent months who are simply unable to obtain cyber-insurance at any price, due to their existing security posture. Some experts are even predicting that cyber threats will ultimately become un-insurable.
And of course, let’s not forget that the weakest link in any defence is always the people. The more we impose security restrictions on staff, the more likely they are to find ways to circumvent them, so the more we need to train them on the importance of cybersecurity, and so on it goes.
In short, thanks to the rapidly escalating threats facing all organisations, there is no longer any doubt that cybersecurity is now a board-level issue, and any business that treats it as anything less will very quickly be forced to deal with the consequences.
Further reading:
- The biggest data breaches of 2022 – Including some big Australian names such as Optus, Medibank and Bunnings.
- Aussie businesses increase cyber spending in 2023 – Business leaders are committing to greater spending on cybersecurity following recent high profile security breaches at Optus & Medibank.
- Key questions for an organisation’s board of directors – The Australian Investment & Securities Commission has compiled a list of key questions for board members to consider.
- Cybersecurity tips for CEO’s – 5 actionable steps for CEOs.
- The Essential 8 – An actionable framework promoted by the Australian Government for mitigating cyber security incidents. +
Summary
2023 is shaping up to be an exciting year, with a number of medium-term trends gaining traction. We can expect to see more mainstream adoption of these technologies as they mature past the high-risk early adoption stage and the costs of successful implementation rapidly decrease. To talk about how your organisation can see around corners and take advantage of these trends in 2023, contact us today.
Effective cybersecurity is as much about policy & governance as it is about tools and technology, however knowing where to start with these things can be challenging. In this post we have compiled a list of useful cybersecurity policy resources to help you build and enhance your cybersecurity governance.
Australian Cyber Security Centre
The Australian Cyber Security Centre (ACSC) is an initiative of the Australian government’s Australian Signals Directorate. The website contains a wealth of resources for both individuals and organisations, including alerts for new security threats, and the ability to report a cybercrime or security incident.
Essential Eight Maturity Model
The Australian Cyber Security Centre (ACSC) has developed extensive strategies for the mitigation of cyber security incidents, with the most effective of these labelled The Essential Eight. Not only is the Essential Eight an excellent initiative for every business, Essential Eight compliance is also fast becoming a mandatory requirement for many tenders, contracts and cybersecurity policies.
Essential Eight Maturity Model | Cyber.gov.au
Key questions for an organisation’s board of directors
The Australian Securities & Investment Commission has compiled a list of key questions for board members to consider. Topics include Risk management framework, Identifying cyber risk and incident response awareness.
Key questions for an organisation’s board of directors | ASIC
Create a cybersecurity policy
The Australian government Business website provides an excellent quick-start guide to creating your own cybersecurity policy. Of course every policy will be unique to your own organisation, but this guide provides an excellent template to get you started, including sections such as:
- Password requirements
- Social media access
- Incident response planning
Create a cyber security policy | business.gov.au
University of Queensland Cyber Security Policy
The University of Queensland has published its own Cyber Security Policy which provides an interesting real-world example of such a policy. Although of course uniquely crafted for the university’s own purpose, it does provide a useful example of how such a policy can be shaped.
What is Power Automate?
Power Automate is a tool for automating repetitive and time-consuming tasks. As part of the Microsoft Power Platform, it can integrate quickly and easily into other Microsoft apps such as SharePoint and Outlook but can just as easily integrate with hundreds of non-Microsoft apps using an extensive collection of third-party and custom connectors. Even older legacy apps can be automated using a feature called Robotic Process Automation.
How can Power Automate help my business?
Power Automate is designed to automate repetitive and time-consuming business tasks. Not only does every organisation already have a plethora of these tasks being actioned manually every day, but there are often numerous business opportunities that are simply never pursued due to the perceived complexity and expense of the manual processes that would be required.
Handling these tasks manually is not only an expensive approach but can also introduce significant time delays and potential for human error. By automating these tasks, you can not only move staff onto more fulfilling and valuable activities, but also enjoy having the tasks done almost instantly and with perfect consistency.
Discovering new levels of efficiency with automation can be game changing, however the true value of Power Automate is in its ability to integrate multiple apps and systems together into a single unified and automated workflow. You no longer need to be constrained to the functionality built into a single app but can instead pull together the features and functionality of multiple apps and tie them all together using Power Automate. When used in this way the resulting process or workflow can truly be greater than the sum of its parts.
What type of processes can I automate?
Any computer-based process is a potential candidate for automation, especially those that use modern apps and cloud services such as Microsoft 365. Some examples of simple process automation are:
- Automatically save email attachments to SharePoint.
- Track mentions of your brand on social media to an Excel spreadsheet.
- Request approval of document updates before publication.
Far more complex business processes and workflows are also candidates for automation, using some of the more advanced functionality of Power Automate, such as Robotic Process Automation (RPA) and AI Builder. An excellent example of an advanced use case is presented in this Microsoft Case Study where Coca-Cola entirely automated a manual and complex business process using Power Automate, RPA and AI Builder, avoiding having to hire 10 new full-time employees for mundane data processes tasks.
Getting started with Power Automate
The potential for empowering your people to do more with less using Power Automate is huge, but sometimes it is hard to know how to get started. Rest assured there are numerous opportunities in every organisation for improvement through automation. Here are some tips to help identified where those opportunities lie in your business.
Tip #1
Check out all the Power Automate Connectors that are available, looking for any apps that you already use in your business processes. Click on each connector for inspiration from the templates and examples provided.
Tip #2
Consider any repetitive, data-entry style tasks you may have. Do you often have to re-key data from one system into another? These tasks make great candidates for automation.
Tip #3
Do you have any frequent but complex, multi-step processes that are well documented? Automation can be ideal for streamlining these.
The good news is that because Power Automate is a no-code platform, you don’t need to be a coding wizard yourself to get started streamlining workflows. Of course for more advanced applications you can always reach out to the Power Automate experts at Grassroots IT for help.
How the app can connect your staff and share ideas
Microsoft Office 365 is designed from the ground up to enable seamless collaboration and encourage greater team communication. With this philosophy built into every app, it’s not surprising that there is some crossover between what each app can be used for.
Yammer, SharePoint, and Teams can all be used to improve office communication, each adding different value to the process. Here are 5 ideas for how you can use Yammer to connect staff and share ideas.
1) Share videos of internal training & project handovers
At Grassroots IT we frequently run internal training sessions. These sessions are normally hosted by one of our team who has a particular expertise, or body of knowledge that we want to share with others.
Recent examples include a refresher session for our helpdesk staff on best practice for managing tickets; an introduction to Privileged Identity Management; and a project handover from our project team to the support team, training them on what they need to know to support a new Azure implementation.
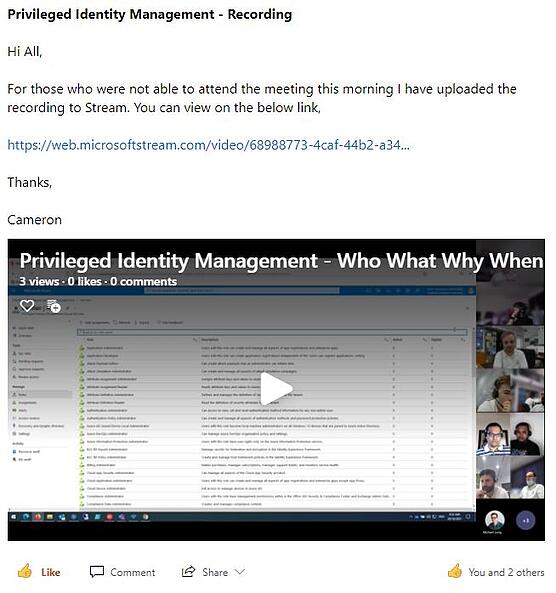
Because our team works across multiple locations, these sessions are always held online via a Teams video call, making them super easy to record. These recordings are then stored in Microsoft Stream and shared in a Yammer post.
With the video available in Yammer, staff who were unable to attend the live session can still join the discussion afterwards, raising any further questions or comments that they may have. Stream also offers the additional benefit of automatic transcription of the audio, providing an easy way to search the video for any particular references.
2) Encourage experts to share their knowledge via Yammer
Every organisation has its subject matter experts. These champions have a particular passion for a topic and enjoy digging deeper and learning all they can. Yammer provides the perfect platform for these experts to share their unique knowledge with the broader team. It helps not only to educate others, but also to celebrate their own contribution to professional development.
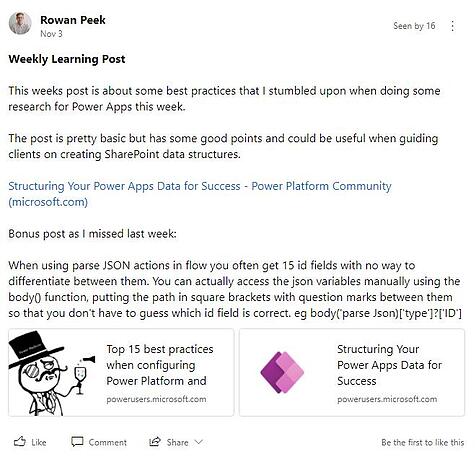
In the complex and fast moving world of IT we find posts such as this Weekly Learning Post on the Microsoft Power Platform particularly useful for encouraging learning and further discussion.
3) Use Yammer to explore ideas together
It’s often said that two heads are better than one. So if you have a team full of people with diverse and valuable experience, why wouldn’t you use that resource for exploring ideas? Yammer is the perfect platform for encouraging the sharing of ideas across the broader team in an asynchronous way.
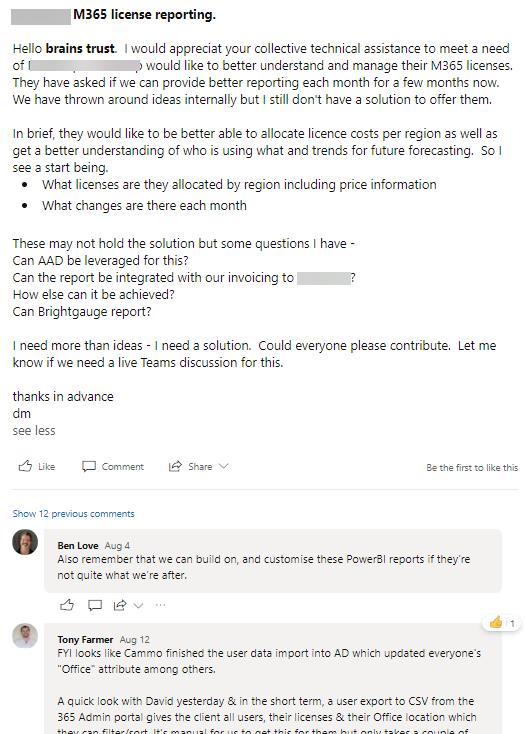
One recent example was when a client wanted greater control of their internal cost allocation of Microsoft 365 licensing. This isn’t something that Microsoft 365 could help with out of the box, but with some collaborative ideation we were able to design a solution that met their needs.
4) Keep staff connected with business leaders
Keeping staff connected across all levels of the organisation can offer significant benefits. It’s particularly important as staff numbers grow, and the risk of communication breakdown increases.
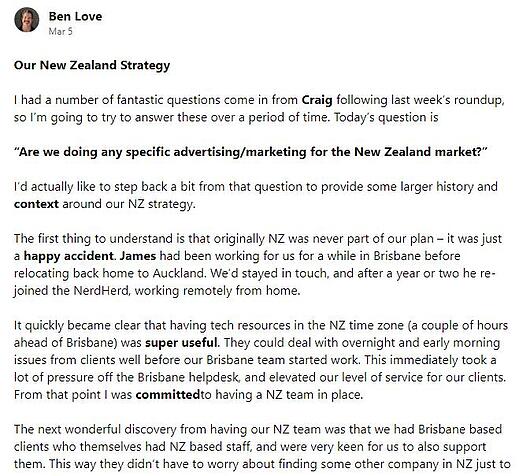
Yammer offers business leaders the ideal platform for keeping staff informed about business performance and strategy, and inviting questions and discussion.
5) Have some fun!
Who says work shouldn’t be fun, right? It’s fascinating to learn more about what our team do with their time. Recently via Yammer we’ve discovered that James grows chilies, David recently completed the trek of a lifetime, and Michael’s mad keen on footy tipping.

Find out more about improving office communication
If you’d like to know more about how you can use Yammer to connect your staff and better share ideas, contact us today.
Manoeuvre your Windows PC with just your voice
When Pam (a busy property manager) broke her wrist roller skating over the weekend, she thought she wouldn’t be able to get back to work at the real estate agency until she got her plaster off.
However what Pam didn’t realise is that Microsoft has some pretty nifty dictation features built into Windows and the Office 365 suite which had her back in action sooner than she expected.
Yes. You can do this with Windows’ dictation feature that uses speech recognition.
This is a speech-to-text tool that provides accessibility to its users and, conveniently, it’s already built in to Windows so you won’t have to install new programs for it to work. Microsoft envisions this tool will support users that are looking for a more accessible alternative to traditional typing.
We don’t want an unfortunate roller skating incident to keep you from getting work done on your PC or mobile device. Here’s how to activate and start using the dictate feature in Windows and Office 365.
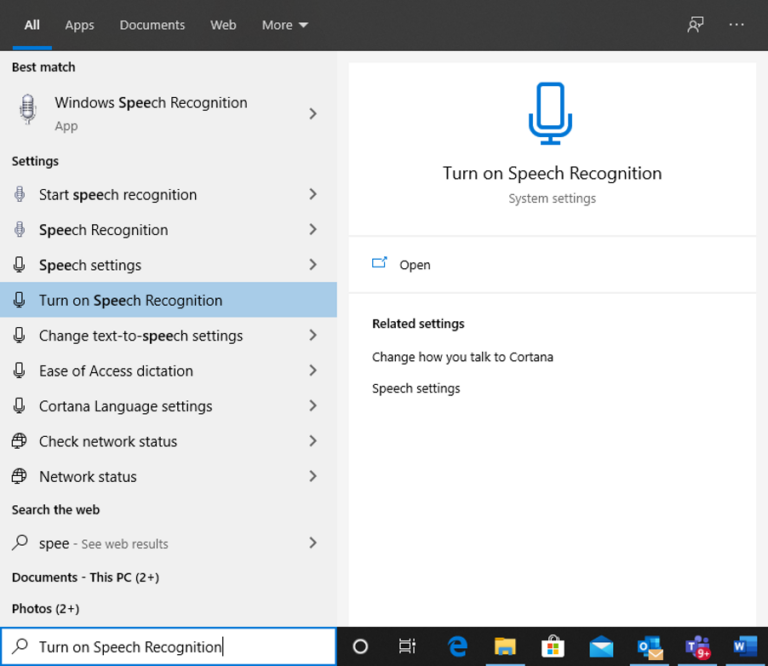
First, you need to make sure that Speech Recognition is enabled on your PC. You can do that by looking up ‘Turn On Speech Recognition’ from your Windows search bar. This will take you to the Speech settings window.
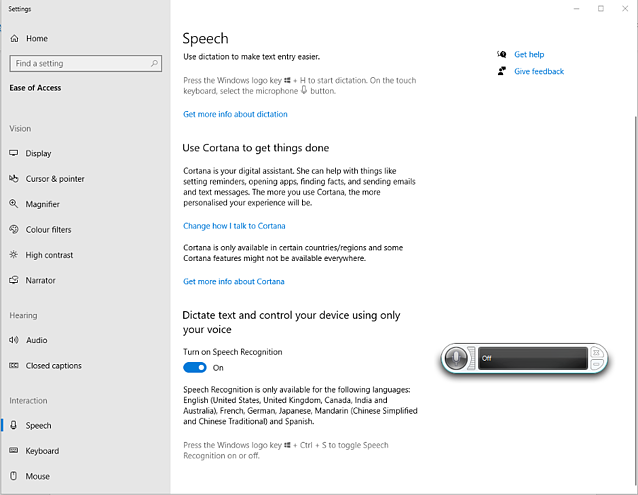
From Speech Settings, see that the toggle marked Turn on Speech Recognition is set to On. If not, click the toggle to turn it on and a speech recognition widget will appear.
Now, you can try using speech-to-text dictation on several apps.
Please note that you need to be connected to the internet to be able to use dictation because it is part of the Azure Cognitive Services. This means that this tool uses utterance from users to further improve the dictation experience.
On a Windows machine, you can utilise Cortana (like Siri on Mac and mobile devices) as your digital assistant to do things such as opening apps, setting reminders and writing emails.
To start dictation, select a program you generate text in (like a Microsoft Word document or an email in Outlook). You can then easily use the hotkey Win+H (Windows icon key then ‘H’) on your keyboard to open the dictate toolbar. You’ll then hear a beep and text on the toolbar saying ‘Listening…’ which means that your dictation service has started.
There are a couple of other ways to activate dictation depending on the app or device you are on.
On Desktop Office Apps
The dictation feature is most useful in the following Office applications where its main focus is generating text:
- Word
- OneNote
- Outlook
- Powerpoint
(Less helpful in apps like Excel, for obvious reasons).
In Microsoft Word, you can find the Dictate button from the Home ribbon.

You can click on the arrow down button to show a drop down menu. It offers various language options for you to choose from.
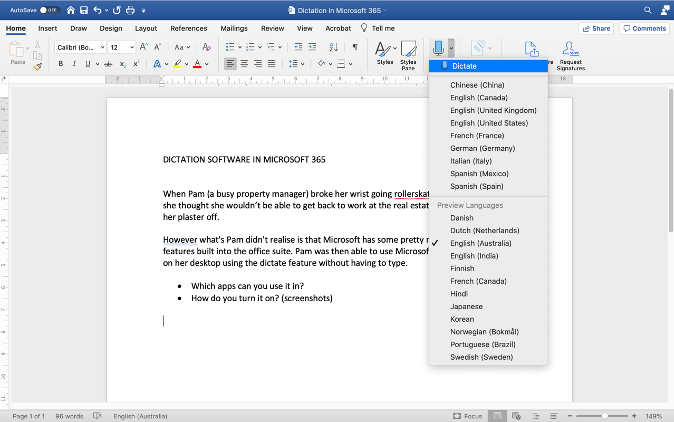
Here’s a short tutorial video to help you navigate the Dictate button on Microsoft Word:
Unlike Word that has a dedicated button for the Dictate feature, the other Office applications mentioned above may need the use of the hot key Win+H for dictation to start. There are also restrictions to the capacity of the dictate tool to respond to certain commands in other Office applications.
In 25 August, 2020, Microsoft announced a new feature called Transcribe in Word which allows you to record or upload audio of conversations and have it automatically transcribed into a Word document. This feature enables users to proactively participate in an oral discussion without the worry of missing out on notes.
The Transcribe feature supports various audio file types like .mp3, .wav, .m4a or .mp4. For now, Transcribe for Word is available at no extra cost using the web version of Word in all Microsoft 365 subscriptions but you can look forward to using it in your Office mobile in the coming months.
On Mobile Office Apps
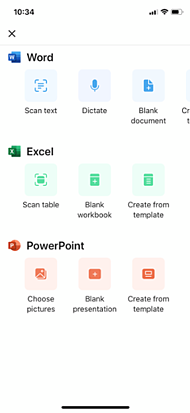
If you’re using the Office app on your mobile phone, tablet, or touch screen device, you can select Documents from the main menu and then choose to Dictate in Word.

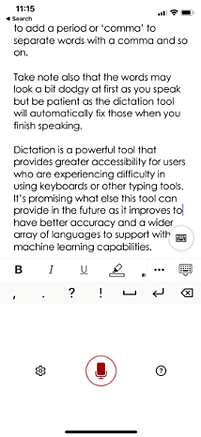
The Help & Support feature within the Office app can provide more tips on voice commands to ensure your dictation experience is more smooth.
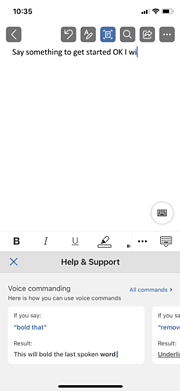
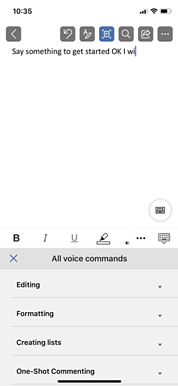
What commands can I use?
Since the dictation service is part of the Azure Cognitive Services, it is continually improving and expanding its command knowledge. We can list down some of the most common commands you can use using the dictation tool but keep in mind that this list will continue to grow as more people use the tool.
| To do this… | Try saying… |
| Clear section | Clear selection or unselect that |
| Delete the most recent dictation result or currently selected text | Delete that; strike that |
| Delete text, such as the current word | Delete [word] |
| Enter one of the following keys: Tab, Enter, End, Home, Page up, Page down, Backspace, Delete | Tap Enter; press Backspace |
| Select a specific word or phrase | Select [word] |
| Turn spelling mode on and off | Start spelling; stop spelling |
Although dictation can support multiple languages, it can only dictate basic words, symbols, letters, and numbers in seven other languages besides English. The dictation commands mentioned above are available in English only.
To know more about dictation commands, Microsoft has a document source page to help you.
It is believed that our brains work with ideas faster when we speak than when we write or type words. Therefore, this dictation tool opens a potential for better productivity and faster thought process for its users. But keep in mind that there are still windows for error on this one. Like on formatting and grammar.
Although it is continually improving to provide a more accurate dictation service, the tool still does listen to what you say and translate it to text as it is without the punctuations you mean to put in between words (unless you say a command to add in the formatting). You can say ‘period’ at the end of your sentence to add a period or ‘comma’ to separate words with a comma and so on.
Take note also that the words may look a bit dodgy at first as you speak but be patient as the dictation tool will often automatically fix those when you finish speaking.
Dictation is a powerful tool that provides greater accessibility for users who are experiencing difficulty in using keyboards or other typing tools. So next time you have a rollerskating accident, you can rest easy knowing that you’ll be back typing (using your voice) before you know it.
It’s promising what else the dictation tool may provide in the future as it improves to have better accuracy and a wider array of languages to support with its machine learning capabilities.
Businesses tend to spend considerable effort on social media, but email is still really important for client communication and marketing. In fact, compared to other marketing channels, email marketing actually has a 4400% ROI which means that for every $1 spent, you generate $38 in revenue. (Campaign Monitor)
Email is an opportunity for us to give a great impression to current or potential clients, so it’s good to put your best foot forward, right?
Perhaps being in a marketing role, I’m a little obsessed with branding consistency, but when I see various font styles, sizes and colours being used in the communications from one single organisation, I could just put my face in my hand.
So when it comes to setting up email signatures that are consistent across all members of your organisation, we have a great tool for you – that’s not only easy to set up, but is great value for money.
Enter: Exclaimer.
What is Exclaimer?
Exclaimer is an email signature management software that allows users to have central control over email signatures across an organisation. The software helps maintain a more consistent branding and content for emails.
With Exclaimer, you can design an email signature template that fits your company branding and current goals and it’s easily set up via a web interface. This web-based interface allows authorised users to edit from any device and at any given time. Once an email signature is all set up and ready, Exclaimer can automatically add this email signature every time a member of the organisation sends out an email, ensuring that all email marketing efforts are more streamlined across all members of the organisation.
How do I create Exclaimer email signatures?
The best thing about having Exclaimer is that it doesn’t require HTML skills. With a drag and drop type web interface, anyone can easily create a high quality, branded email signature by using one of the readily available templates or by creating your own unique layout. All there is left to do is to add in logos, images (such as employee headshots) and other information you want to appear in the email signature and Exclaimer will do the hard work in the background.
Here’s a quick walkthrough to how Exclaimer lets you easily create consistent email signatures:
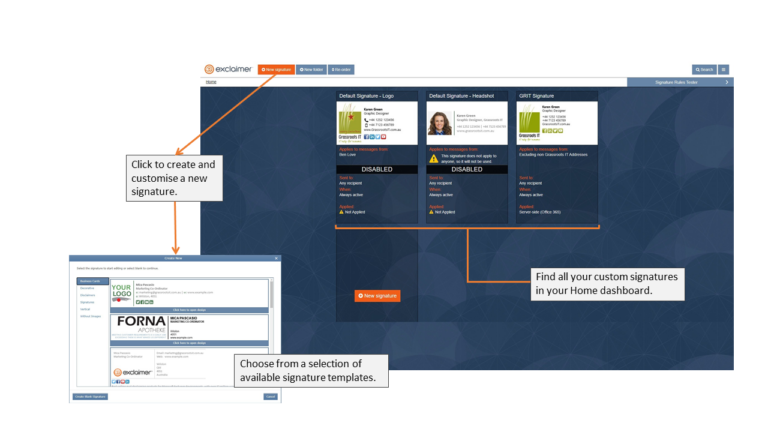
- Exclaimer Home dashboard.
Here’s where you can find all of your signature creations. Here, you can organize them with names or move them into folders. You can also manage your email signature functions like email recipients, date/time triggers and more. You can also find the “New Signature” button on your Home dashboard which will lead you to another window that lets you choose what type of email signature to create.
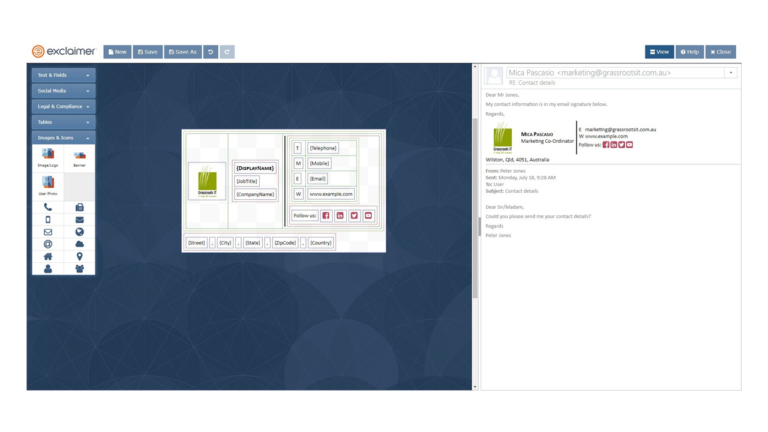
- Exclaimer Template Designer
Once you’ve chosen from the many available templates, you will be taken to the Template Designer page where you can do all the customisations you want. Exclaimer’s convenient tools let you drag and drop elements into your signature so you can go wild with your signature design. Don’t worry about going TOO wild with the elements you’re adding to your layout, though, because you can find a real-time preview of your email signature on the right pane of the page to ensure it’s correct before it goes live.
Exclaimer email signatures can be customized for different teams, for replies or new messages, or for internal or external messages. You can even base rules on data only Exchange can capture, including the email recipient or the sender.
At Grassroots IT, we use Exclaimer to set fun, holiday themes to our organisation’s email signature like this:

Or add a link to register for our latest webinar or event. We can add important notes too, such as a legal disclaimer or latest opening hours. This way we’re assured that the whole team is sending out the same up-to-date information while maintaining our consistent branding.
Exclaimer Compatibility
Exclaimer is designed to work on any device so that users won’t have to worry about the consistency of email signatures no matter what device the email is sent from. Since it’s a cloud-based product, it can be accessed from anywhere in the world using either a PC, MAC, laptop, tablet or mobile phone whilst maintaining the high quality of email signatures.
Exclaimer also offers its services to a variety of users making it easily available no matter what platform you’re using to send your emails. So don’t worry about your organization using Gsuite, Office 365, or Outlook, etc. because Exclaimer would work perfectly on any platform.
How Much Does Exclaimer Cost?
This’ll be good news. Exclaimer is pretty darn cheap! Subscriptions start at a minimum of 10 users and initially costs around US$2 per user, per month. You can find a pricing metre from the Exclaimer website to see actual costs. Considering all the value a business can get from this product, including minimal setup time for streamlined email signatures across the whole organisation, it offers great value for your money.
Does Exclaimer store emails?
No. Exclaimer doesn’t send the emails for its users because it’s not an email management software. Your emails, however, run through Exclaimer so your customised email signatures can be added on while the email itself stays securely within its email server. Think of Exclaimer as a drive-thru for email signatures.
Below is a visual map of how Exclaimer processes your emails from your Office 365 and back:

Exclaimer fully integrates with your company’s Active Directory, providing consistent contact information across all email signatures.
Why Exclaimer?
Managing your email signatures on Exclaimer means that you’re eliminating inconsistencies in your email content that may negatively affect your email engagement, the effectiveness of your message and your business in general.
Have you ever received a new registration to your event that was actually held six months ago? Then you figure out one of your staff members hasn’t removed the event registration link from their email signature yet. Or perhaps a client marks your emails as Spam because the email signature looks a bit dodgy and not on brand. These are problems that can easily be solved by keeping your email signatures controlled centrally.
Having one place to manage all your email signatures across staff members can keep your branding consistent and leverage your email marketing activities. Exclaimer is (from our experience) the easiest, cheapest and best tool for that job.
If you’d like to arrange a free trial of Exclaimer email signature manage and see just how simple it is to use, get in touch today.
It is a common understanding that passwords are supposed to protect our accounts. But how much does your designated password protect you and your information? If the bad guys come hacking into your personal and corporate accounts one day, how sure are you that it’s going to be a tough job for them? Let us help you assess how easy it is for a hacker to take a quick guess of your password.

Your password is your first line of defense from wrong doers in the digital world. And yet, it is something that we often overlook and take for granted. When was the last time you spent a dedicated amount of time to think about what password to use for your new account? We often just use a single password across all of our accounts to save us the time and effort. Am I right? This is a definite no-no! Using a single password for all accounts is just making a hacker’s job much easier. So what is the best way to manage passwords and protect your accounts?
In order to plan for an effective account protection strategy, let’s start with a rundown on how hackers guess passwords:
1. Wild guess
Although you can’t really call it ‘wild.’ These hackers are trained to squeeze the juice out of your public information just to get a list of sophisticated guesses to your password. They use sophisticated programs and procedures to ultimately catch that one ticket into your personal data.
2. Shoulder Surfing
Sadly there are lurkers who discreetly stick their heads out from behind your shoulder as you type in your password, prying on what you type and browse. Don’t underestimate them – always be cautious of who can see your information in your surroundings.
3. Dictionary-based attacks
There are some hackers who are so hard working that they would endure matching your personal data with every word in the dictionary. Yes, they exist. They would browse through every possible word to partner with, for example, your birth month, in order to guess your passwords.
4. Phishing
Be careful of strange emails that you find in your inbox – this might be a phishing attack. They might be schemes sent by scammers who are trying to lure you into clicking and opening malicious files that intend to steal your personal information. As of October 2018, phishing activities has already cost victims $47,676 of loss this year (source: scamwatch.gov.au). So beware of being tricked into opening an email about winning a brand new car and clicking on links.
5. Brute-force Attack
As the label implies, it’s a pretty vicious attack on your accounts. All the hacking techniques mentioned above are used on your account to track your keystroke and eventually get whatever important data can be stolen from you.
Knowing these hacking strategies and your current password choices, can you confidently say that your accounts are safe? Now that you already have an idea how cyber criminals do it, here are some ways on how you can minimise your risks:
Password Security Tips
1. Create a password with at least 8 characters.
I know people will usually recommend starting at 6 but, it wouldn’t hurt to add in two more characters if it means increasing your security because nowadays, the longer your passcode is, the more time a hacker needs to spend cracking their way into your account.
2. Make use of a variety of lowercase and uppercase letters, numbers and special characters.
To make it harder to track and follow your keystrokes, you might want to utilise as much letters and characters as you can.
3. Never use your personal data in your password. Remember how hackers can ‘guess’ well?
Remember that most of the time, the people who are trying to hack their way into your account already know enough about you. Don’t use a word or phrase that can be obviously related to you.
4. It’s better if you don’t use real words.
What I mean by this is that you can use words that are hard to “guess” and identify. Maybe use that one phrase you came up with in primary school that nobody understood.
5. Make random patterns that hackers will have a hard time following.
Hackers can track your keystrokes in order to decipher which letters or characters you are constantly using. Making your password random can help minimise the risk of getting your usual password input tracked and followed by cyber criminals.
You can also have a look at an infographic of an anatomy of a secure account to have a more comprehensive view of how you should be securing your accounts.

Don’t take your password for granted and take the easy way out, rather than thinking of a good one. And if you’re like me who tends to forget anything (and everything), including passwords, there are tons of useful tools and apps that you can use to store your precious security passcodes.
Here are some of the more well known password management programs.
1. LastPass
One of the top on the list of best password managers. It features advanced hashing that provides a secure haven for your passwords. It runs across a wide range of operating systems and is free of charge unless you want to buy Premium subscription. Having the free version is not bad at all with 2 Factor Authentication feature and a robust password generator.
2. Dashlane
Aside from keeping your password safe. Dashlane also has a feature called digital wallet where you can safely manage your credit card information so you can securely make online purchases. It also allows you to sync your data to the cloud so you can access your passwords wherever.
It is one of the most user-friendly password applications in the market. It may look a little outdated but works as well as the other ones already mentioned. It provides secure management for an unlimited number of passwords. It is free of charge unless you upgrade to premium then you can sync your data into different devices.
4. bitwarden
It is an open source software (which means it’s free!) that features 2-Factor Authentication, end-to-end encryption and enables syncing to multiple devices without limits. It also boasts a password generator and runs through multiple operating systems.
At Grassroots IT, we recommend the BEST way to protect your accounts is using Multi Factor Authentication (MFA). So that even if the hackers guess your passwords, they still need a real-time authenticator to get into your accounts. Read more about that over here.
It can be easy to overlook such a thing as your account passwords but we really do live so much of our lives online these days, that it’s become increasingly important to be vigilant about protecting our personal information and corporate data. If you need any help setting up some additional security for your personal accounts, don’t hesitate to make a time with us.
Back to more news, updates and resources or learn more about Cybersecurity
Tips for installing Word and Excel
A lot of Microsoft Office 365 plans include what’s called Desktop Licensing. This is the bit that lets you install the Microsoft Office applications such as Word and Excel on your computer. In this post we show you how to install Office 365 on your computer.
1. Sign in with your work or school account at https://portal.office.com/OLS/MySoftware.aspx.
Note: If you don’t see Office listed, your plan probably doesn’t include Office applications. If you know your plan includes Office, you may not have a license assigned. See What Office 365 product or license do I have? If Office is not listed, ask your Office 365 administrator to assign a license to you.
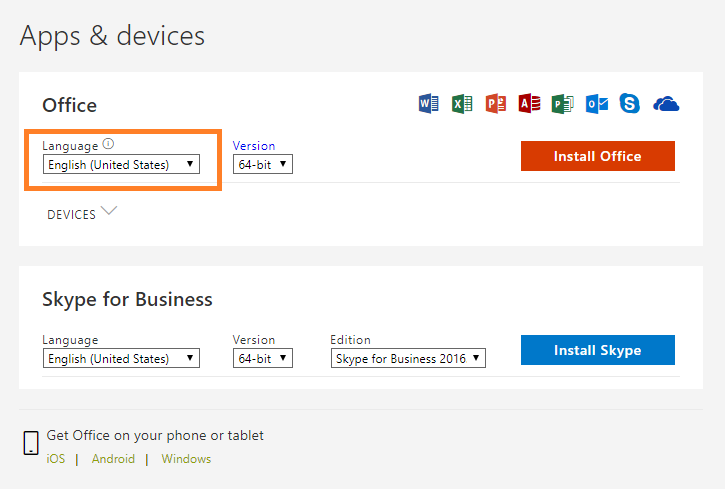
2. On the Office page, set-up which version of Office 2019 you want to install. By default, the 64-bit version is selected. You can change this by clicking on the drop-down box under Version.
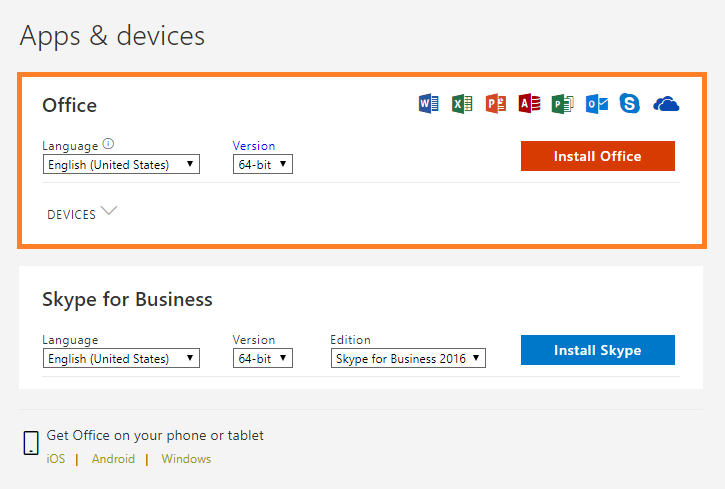
IMPORTANT: The process that installs Office 2019 also uninstalls all Office 2016 products. If you previously have the 32-bit version of Office installed, you should first uninstall this version before upgrading to the 64-bit version.
If you’re not sure which version you currently use, have a look at What version of Office am I using? or if you’d like to know which version you should install, read on Choose between the 64-bit or 32-bit version of Office.
3. Select a preferred Language from the drop down list under Language.
- Select Install.
- Depending on your browser, go to the install pop-up that appears then click:
- Run (in Internet Explorer)
- Setup (in Chrome) or;
- Save File (in Firefox)
NOTE: If you’re using Edge, first click Save, and then click Run.

If you see the User Account Control prompt that says, “Do you want to allow this app to make changes to your device?” Click Yes.
6. The install begins…

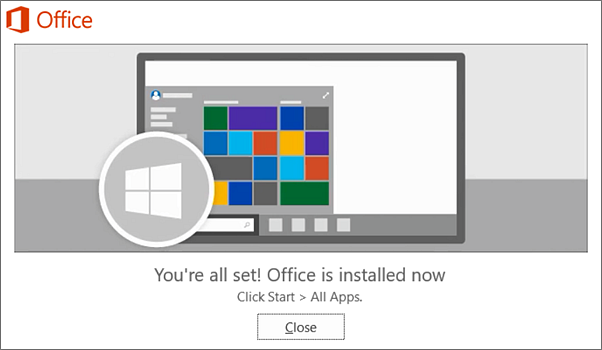
7. Your installation of Microsoft Office 365 is finished when you see the phrase, “You’re all set! Office is installed now”and an animation plays to show you where to find your Office applications on your computer. Follow the instructions in the window.
For example Click Start > All Appsto see where your apps are, and select Close.
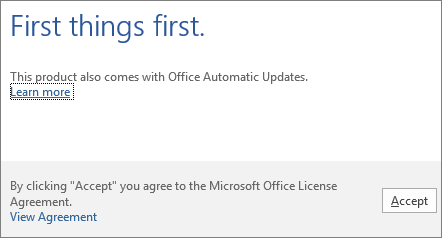
8. Start using an Office application right away by opening any app such as Word or Excel. In most cases, Office is activated once you start an application and after you agree to the License terms agreement by clicking Accept.
Now you’re ready to use Office 365!
A quick recap of the steps for installing Office 365
- Sign in with your work or school account.
- On the Office page, set-up which version of Office 2019 you want to install.
- Select a preferred Language.
- Select Install.
- Depending on your browser, go to the install pop-up that appears.
- The install begins…
- Your installation of Microsoft Office 365 is finished when you see the phrase, “You’re all set! Office is installed now”
- Start using an Office application right away by opening any app such as Word or Excel.
If you’re curious as to how other successful businesses utilise the Office 365 suite to the best of their advantage, you can head to one of our free webinars by clicking here or if you’re looking for new features and new ways to work your way around your freshly installed Office 365, click here.
Right when you need professional assistance in your Office 365 journey, we’d be glad to be there and help! Just reach out to us and let’s talk about how you can make the most out of your Office 365.
Are you ready to get solutions that drive positive change to your business? Reach out to us to know more about how we can build these solutions together.
There is one app on my iPhone that I now simply cannot live without. The app is called Office Lens and it is available for free at the Apple App Store and for your Android phone on Google Play.
In a nutshell, the Office Lens app is a portable scanner in your pocket. Now, these kinds of apps aren’t new. You have Evernote, Scanbot and no doubt a variety of other flavours available to you on your Smartphone but where Office Lens shines is in its tight integration with the Office 365 suite.
If you are rocking Office 365, odds are that you already enjoy the mobility and agility of access to all your documents and productivity applications from anywhere on your phone. Here is another tool in your toolbox to get the most out of the modern workplace.
Practical uses of Office Lens
Here are just some of the ways that I have personally used Office Lens in the past few weeks:
- At presentations:
I have been fortunate to attend some fascinating road shows hosted by cloud companies who are making fantastic presentations up on the big screen. Problem is, you’re often seated at a weird angle off to the side, right? You will see people snapping pics of the big screen at these kind of events, which is a great way of capturing the information. But, if you are using Office Lens, the image will automatically identify, keystone (correct the angle of the image for ease of viewing) and save with an optimised image where you can store it away in a OneNote file to annotate and comment so that you can more easily document and retain all of the cool stories on display.
- When collecting business cards:
Collected a pile of business cards at that networking event? Snap them in Office Lens and the app will automatically identify the printed text with optical character recognition (OCR) and generate contacts that you can add right into your phone. Handy.
- When documenting receipts:
When compiling expenses, having to dig out all those paper receipts can be tedious. Instead of being monopolising the office scanner in a scanning marathon, Office Lens enables you to snap a photo with your phone at the time. Office Lens will automatically crop, enhance and clean up the image and export it to your OneDrive as a PDF document ready to attach to your expense claim. Job done.
Sounds good, right? But how do you do it?
How-to Steps
- Install Office Lens on your device. Run the app, then give it permission to access your camera.
- The default view is a camera viewfinder. You can select from “Business Card”, “Document”, “Whiteboard” or “Photo” then point the phone at whatever you are wanting to capture.
- For Documents or Whiteboards, you’ll see the app attempt to frame the object by detecting the corners. Once it is framed to your satisfaction, snap it.
- The app will present you with a preview and give you the option to perfect the layout, be it cropping or rotating the image.
- You will be presented with a list of destinations for the image. This is where Lens comes into its own. You can save as: an image to your Photo Gallery, as a PDF to your OneDrive (perfect for those expense reports), to OneNote (perfect for saving presentation slides where you can annotate and comment) and you can even save directly to a Word document or PowerPoint Presentation.
- If you are working through multiple slides, or receipts, go ahead and append on the next one.
Have you given Office Lens a run yet? I’d love to hear how you are using it in your business.


